Showing posts with label 365. Show all posts

Tuesday, June 30, 2020

What's new and changed in Dynamics 365 Finance 10.0.11 (July 2020)

This topic lists features that are new or changed for Microsoft Dynamics 365 Finance version 10.0.11. This version has a build number of 10.0.464 and is available as follows:

  • Preview release: April 2020
  • General availability (self-update): May 2020
  • Auto-update: July 2020

Features included in this release

The following features are included in this release. The feature titles link to additional information on the Release plans site.

Additional resources

Platform updates for Finance and Operations apps

Dynamics 365 Finance 10.0.11 includes platform updates. To learn more, see Platform updates for version 10.0.11 of Finance and Operations apps.

Bug fixes

For information about the bug fixes included in this update, sign in to Lifecycle Services (LCS) and view the KB article.

Regulatory updates

For information about regulatory updates for Dynamics 365 Finance and Operations apps, see Regulatory updates. Another way to learn about regulatory updates is to sign in to LCS and view the planned regulatory updates using the issue search tool. Issue search lets you search by country, type of feature, and release.

Dynamics 365: 2020 release wave 1 plan

Wondering about upcoming and recently released capabilities in any of our business apps or platform?

Check out the Dynamics 365: 2020 release wave 1 plan. We've captured all the details, end to end, top to bottom, in a single document that you can use for planning.

Removed and deprecated features

The Removed or deprecated features in Dynamics 365 Finance topic describes features that have been removed or deprecated for Dynamics 365 for Finance and Operations.

  • removed feature is no longer available in the product.
  • deprecated feature is not in active development and may be removed in a future update.

Before any feature is removed from the product, the deprecation notice will be announced in the Removed or deprecated features in Dynamics 365 Finance topic 12 months prior to the removal.

For breaking changes that only affect compilation time, but are binary compatible with sandbox and production environments, the deprecation time will be less than 12 months. Typically, these are functional updates that need to be made to the compiler.

Saturday, February 25, 2017

List of DIMF avilable in AX7 \ Dynamics 365

 
List of DIMF available in AX7 \ Dynamics 365
 
In Dynamics 365 is more flexible to Ax2012, we have total 1967 entity for import the data to direct in the Table. it is cover mostly full Axapta table, even the process also very simple and impressive, you can direct import from form level.

 
 Click here for download the list of entity
 

Monday, February 20, 2017

Hire the Employees and Earning Statement Process in Dynamics365


Hire the Employees and Earning Statement Process in Dynamics365


In earlier discussion, I explained how to create position in Dynaics365, now we discuss how to create the Employee and process the salary in Dynamics365.


To Create a employee, Go to Human resource and select the Employees.


Click on the new Employees and add the name of employee. Automated personal number allocate to employee on the basis of number sequence, enter the SSN number and Employment Start date.


We can assign the position later or same time. After tick on the ASSIGN POSITION, all blank position is available for allocation. We assign same position we created in previous blog.


In profile section we assign the basic details of the employee.


In personal section we assign the personal information of employee


We have different section for entering the different information. Other important part for salary is his/her Bank account number and disbursement detail. For that we click on bank account under the more information and enter the bank details.


After enter the bank detail, click on the bank account disbursement form and click on new.


For the detail of Benefit and benefit accrual. Click to add on benefit and benefit accrual form.

Click “New”
For enter the benefit accrual click on “Benefit Accrual” and enter the details.


For assign the compensation, click on the Compensation and enter the fixed compensation.


Enter the Fixed Compensation for annual, click on new and enter the annual fixed compensation for annual.

Monthly and hourly equivalent will be calculated accordingly.


Other important things for Salary Generation in Worker Tax region and Default Tax regions. For enter the tax regions detail go to payroll tab and click on worker tax regions.
Close the form and select the Default tax regions.
Now Click on the Earning Statement and Generate the Earning Statement.
After the completion of the process info log appears.

Friday, February 17, 2017

Create Position in Dynamics365 (AX7)


Create Position in Dynamics365 (AX7)

Today we are going to discuss the step of position creation. For creation for position

Go to Human Resource module Click on position.


Click on the position then create new Position and assign the job and activation date for Position. Please note that Position Id will be generated on the basis of the number sequence


For Ex:- I have assigned Position of Account Manager job and activate from 01st Jan 2017 and click on the create position.


We can enter the Position detail. We will update the Department, Position Type, Compensation region, available for assignment.


For update hierarchy, we assign the report to position.


The most important part of position is payroll section. Please enter all the details.


 For the accounting prospective we enter the default Financial Dimensions for payroll.


This is the step for creation position in Dynamics365. Let me know if you have any doubt


Thanks


Wednesday, January 25, 2017

Vendor Invoice Process in Dynamics365


Vendor Invoice Process in Dynamic 365

In Dynamics 365 have simple process of create the vendor invoice.

Go to home pages and select the Vendor.


Click on the Purchase invoice.


In Dynamic 365, Base on your selection vendor is select for the invoice. for the Vendor Invoice Item Number , Quantity and Vendor invoice number is mandatory.

In Dynamics 365,Base on the vendor master setup tax code pick up automatic. you can change it your requirement and sale tax amount calculated base on the selection.

In Dynamic 365, You can Enter the discount in percent or amount.


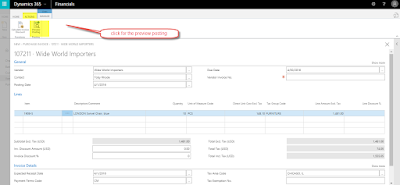
For the check the posting we click on actions tab and click on preview posting.


It shows all the related transactions of different type.


For the GL entry click on 7.


Click on close and you can attach the document for the reference. for post the invoice click on post button

.


After the post you can take printout document or save it.


The preview of pdf document as follow.


Thanks


Kamal Kumar

Ph- 91-9996480619

Tuesday, January 24, 2017

View Posted Sale Invoice in Dynamics 365


View posted Sale Invoice in dynamics 365


Go to Dynamics 365 Home Page. Click on the Home and select the Sales.


There is different option for invoice and credit note for create new invoice click on the invoice tab. For the view the posted sale invoice click on the posted sale invoice


.


Every Columns have option to filter, you can sort and pass criteria according your requirement,


Click on view and Check the Sale order. you can reprint also.


.


Thanks


Kamal Kumar

Ph-9996480619

Create Sale Order in Dynamics 365

Create Sale Order in Dynamics 365

In Dynamics 365 have very simple step for Create the Sale order.

User left click on "New - Sales Order - Dynamics 365 for Financials (window)" in "New - Sales Order - Dynamics 365 for Financials


Enter the require Detail

New - Sales Order - S-ORD101007 ∙ Litware, Inc. - Dynamics 365 for Financials (window)" in "New - Sales Order - S-ORD101007


Enter the Number of Item is 10 and base of item Setup Total Amount and Sale Tax automatic pic in the Sale Order.


Cross Check all the detail like sale  tax amount and shipping address,post and print.


Printed Sale Order invoice and save in PDF format.


Project Expense Management in Microsoft Dynamics AX

The Reference Companion Guide is a Students guide and take away for this course. Please download, email or upload this guide for future use ...