Wednesday, January 25, 2017

Vendor Invoice Process in Dynamics365


Vendor Invoice Process in Dynamic 365

In Dynamics 365 have simple process of create the vendor invoice.

Go to home pages and select the Vendor.


Click on the Purchase invoice.


In Dynamic 365, Base on your selection vendor is select for the invoice. for the Vendor Invoice Item Number , Quantity and Vendor invoice number is mandatory.

In Dynamics 365,Base on the vendor master setup tax code pick up automatic. you can change it your requirement and sale tax amount calculated base on the selection.

In Dynamic 365, You can Enter the discount in percent or amount.


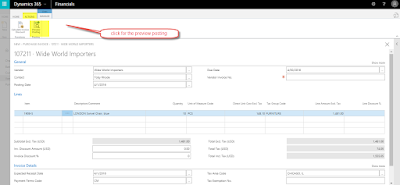
For the check the posting we click on actions tab and click on preview posting.


It shows all the related transactions of different type.


For the GL entry click on 7.


Click on close and you can attach the document for the reference. for post the invoice click on post button

.


After the post you can take printout document or save it.


The preview of pdf document as follow.


Thanks


Kamal Kumar

Ph- 91-9996480619

Tuesday, January 24, 2017

View Posted Sale Invoice in Dynamics 365


View posted Sale Invoice in dynamics 365


Go to Dynamics 365 Home Page. Click on the Home and select the Sales.


There is different option for invoice and credit note for create new invoice click on the invoice tab. For the view the posted sale invoice click on the posted sale invoice


.


Every Columns have option to filter, you can sort and pass criteria according your requirement,


Click on view and Check the Sale order. you can reprint also.


.


Thanks


Kamal Kumar

Ph-9996480619

Create Sale Order in Dynamics 365

Create Sale Order in Dynamics 365

In Dynamics 365 have very simple step for Create the Sale order.

User left click on "New - Sales Order - Dynamics 365 for Financials (window)" in "New - Sales Order - Dynamics 365 for Financials


Enter the require Detail

New - Sales Order - S-ORD101007 ∙ Litware, Inc. - Dynamics 365 for Financials (window)" in "New - Sales Order - S-ORD101007


Enter the Number of Item is 10 and base of item Setup Total Amount and Sale Tax automatic pic in the Sale Order.


Cross Check all the detail like sale  tax amount and shipping address,post and print.


Printed Sale Order invoice and save in PDF format.


Saturday, August 13, 2016

Chart of Account & Main Account in Axapta R3


                          Create Chart of Account in Axapta


In an organisation COA is first and most important things.To find out the Actual financial Statement we create Set of Account (COA). At the time of creation of COA we consider all the possibility and different subdiaries companies Account. 

We can use same COA in Different Company or use different COA in the Different Compnay.In the COA we mention all the main account.


Create the chart of accounts in the Chart of accounts form. Use the Main accounts - chart of accounts: %1 form to set up main accounts in each category, and include gaps between the accounts so that you can insert new main accounts, as needed. Main accounts in the same category have similar account numbers, and often have header and total lines that allow for easier identification and aggregation of the account category.


Same Main Account we can use for the Management Reporter


For Create COA , Please following Step.

Go to General Ledger--> Setup-->Chart of Account-->Chart of Account


Enter the Code of COA

Enter the Description of COA


Click on New


Enter the Detail of Main Account


Detail of Main Account Form


Save and close the Form.


After the link of COA we go to link the Legal Entity and COA


We go to General Ledger --> Setup-->Ledger


Thanks


Kamal Kumar

Ph- +91-9996480619


Email-kamalkumarax@gmail.com


Tuesday, March 15, 2016

Dynamics AX 7: Import/Export data using composite entity in new M...


Process of import the Data in Axapta2015,


Great blog


Dynamics AX 7: Import/Export data using composite entity in new M...: In this post I will cover import-export data using the composite entities in new Microsoft Dynamics AX RTW. There are 12 composite entities...

Thursday, November 19, 2015

First Look - Dynamics AX Rainer


First Look of Microsoft Dynamics Ax 2015 ( AX7 , Ax Rainer)

features of Ax2015 , Rainer

1.Totally cloud base inter-face.
2. More Flexible and fast.
3. Access though mobile also
4. toch screen application


Tuesday, December 9, 2014

Vendor Customer Relationship in AX 2012


Vendor Customer Relationship in AX 2012


Create a Vendor /customer in Axapta 2012 and the relationship of vendor and customer.
Today we will have a discussion on how to create vendors and customers in AX2012. In some organizations, we purchase some material from our vendors and the same vendor is treated as a customer. AX provides a relationship between the Vendor and the Customer. For the creation of vendor/customer, follow this step. We create a Heaven Enterprise party and create customer vendor relationship.
Home->Common->Global address book
On the left hand, side there is there an option for party, customer, and vendor. If you want to create a vendor, click on vendor or if you want to create Customer click on customer.
k1
We are clicking the Party and entering the details of Heaven Enterprise their address and other misc. details.
k2
Click on the customer in the active pane. After that this party will be treated as our customer and the system will allocate a customer no.
k3
In above system allocation the customer no is –US_SI_0138. You can enter misc details of customer like the terms of payment, method of payment, credit and collection and close it.
k4
After that click on vendor and you follow the same process, enter the misc. details, and close it.
On the right side, there is role detail box, which shows the party details with the vendor and customer no.
We follow this process in AX to create a vendor and customer. When you enter the voucher it also shows the customer/vendor relationship balance like the picture below.
In the customer balance:
k5
In the vendor balance:
k6

Thanking you

Project Expense Management in Microsoft Dynamics AX

The Reference Companion Guide is a Students guide and take away for this course. Please download, email or upload this guide for future use ...